Raspberry Crumb Bars


Raspberry Crumb Bars

Raspberry Crumb Bars

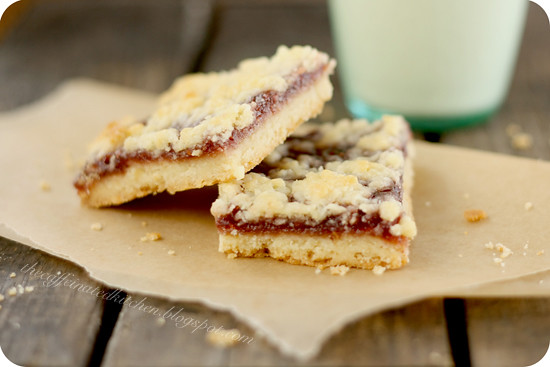
These raspberry crumb bars are, in a word, perfection. I may or may not have eaten 3 the day I made them, but that's irrelevant. The recipe is long and tedious, but don't let that discourage you, the payoff is well worth it - the shortbread is so buttery and crumbly I didn't even have to strategically place the crumbs for my photos. If that's not quality shortbread I don't know what is.


Raspberry Crumb Bars

1 1/2 cups (3 sticks/342 grams) unsalted butter
1/2 cup (100 grams) granulated sugar
3 tbsp confectioners' sugar
2 egg yolks
1 tsp vanilla extract
1 1/4 cups (175 grams) unbleached all-purpose flour
1 1/2 cups (180 grams) cake flour
3/4 tsp baking powder
3/4 tsp kosher salt

1 1/2 cups (510 grams) raspberry jam (with seeds)
1/4 cup (35 grams) confectioners' sugar (optional)

  1. To make the shortbread: Using a stand mixer fitted with the paddle attachment, cream together the butter, granulated sugar, and confectioners' sugar on medium speed for about 5 minutes, or until the mixture is light and fluffy. Stop the mixer a few times to scrape down the bowl and paddle. Beat in the egg yolks and vanilla on medium speed for 2-3 minutes, or until thoroughly combined. Scrape down the bowl and paddle again.
  2. In a medium bowl, sift or whisk together the all-purpose flour, cake flour, baking powder, and salt. On low speed, gradually add the flour mixture to the butter-sugar mixture and then mix for about 15 seconds, or until the flour mixture is totally incorporated and the dough is evenly mixed. Scrape down the bowl again and make sure all of the flour mixture is thoroughly incorporated.
  3. Scrape the dough onto a sheet of plastic wrap. Remove one-fourth of the dough to a separate sheet of plastic wrap. Wrap the remaining three-fourths of the dough entirely in the plastic wrap, pressing down to form a disk about 8 inches in diameter and 1 inch thick. Refrigerate the dough disk for about 30 minutes, or until the dough has firmed up but is still somewhat pliable. Pat the reserved one-fourth of the dough into a small disk, wrap in the plastic wrap, and place in the freezer for at least 2 hours, or until hard. (At this point, the smaller dough portion can be stored in the freezer for up to 1 month. The larger dough disk can be stored in the refrigerator for up to 5 days or in the freezer for up to 1 month. If the larger dough disk is frozen, thaw it overnight in the refrigerator, then let it sit at room temperature for about 20 minutes before using.)
  4. Position a rack in the center of the oven and preheat the oven to 350 degrees F.
  5. Lightly flour the 8-inch dough disk and two large sheets of parchment paper. Place the dough between the sheets of parchment, and roll it out into a rectangle about 13 by 9 inches and 1/4 to 1/3-inch thick. Carefully peel off the top sheet of parchment. Trim the edges so the rectangle has fairly neat sides. Transfer the bottom sheet of parchment with the dough to a baking sheet. Trim the parchment paper so that it fits the baking sheet.
  6. Bake for about 20 minutes, or until the shortbread is light brown. Remove the shortbread from the oven (leaving the oven set at 350 degrees F), let cool for 10-15 minutes, and then spoon the raspberry jam on top of the still-warm shortbread. Spread it in an even layer with the spoon or with a rubber spatula, covering the surface. The heat of the shortbread should soften the jam enough to make it spreadable.
  7. Remove the smaller dough disk from the freezer and, using the large holes on a box grater, grate it into large flakes and evenly sprinkle over the jam. (I found it easier to grate the dough flakes right over the jam because otherwise they softened and clumped together, making them impossible to "sprinkle.")
  8. Return the baking sheet to the oven and bake for another 20-25 minutes, or until the top is lightly browned. Let cool completely on the baking sheet on a wire rack.
  9. When cooled, sift the confectioners' sugar evenly over the top. Trim the edges again, then cut into bars.

The bars can be stored in an airtight container at room temperature for up to 5 days.

8

Today is Katherine's 8th birthday.  One minute that seems perfectly realistic and the next I think how can she possibly be that old? 
Her dinner request was to have a fast food picnic at the park and then to play.  Since it was her warmest birthday ever, we happily agreed.  (It was 64 degrees here, one degree warmer than her birth city of Yangjiang which is on the South China Sea and has a tropical climate!)
The park is one of her favorite places.  At 8, she loves to list her favorite things:  books, American history, sausage, the color turquoise, doing math problems, playing the violin, the Titanic, dogs, sewing with Granny, going to school.
She dreams about living on a farm and raising horses and going to a one-room school.  She can't wait until she is old enough to cook all by herself and do her homework in cursive and play real songs on the violin.
Sometimes she wishes that she had a dozen brothers and sisters.  And sometimes she wishes she was still an only child.  But mostly, she likes being Rachel's big sister. 
I look at Katherine and am continually astonished at who she has become.  And that she is mine.  Sometimes I wonder what ever happened to that sweet, scrawny baby I first held in China.  Then the light catches just so...
...and there she is.  Happy 8th birthday, Katherine Guo Dan.
You are amazing...


randomness

just got home from bible study. i'm always a little worn out after leading. i love it but i always need a little time to turn of my brain and just not think for a bit!

my little lady is at school and my little guy is down for his nap. i made this for lunch...
nothing better than a big salad and a nice quiet house!

this weekend was busy! we painted.

it's our family room. it was a yellow-white color. since the room doesn't get direct sunlight it is a hard room to pick a color for. i went with polar bear white, to brighten it up a bit! it looks much better!

we also had some friends over and had a ton of fun! i made two types of enchilada casseroles. one of the recipes you can find here.

the other recipe is from our friend Joy, who use to live by us in PNG...

White Enchiladas
1 cup mushrooms
1 can of roasted green chilies
1 cup of sliced black olives
1 cup of sour cream
1 can mushroom soup
1 bunch green onions
1 tsp chili powder
½ tsp cumin
1 cooked boned chicken breast per serving
1 dozen white flour tortillas
1 cup of sharp cheddar cheese

If you have not done so before hand, boil the boned chicken breasts for 20 minutes, remove skin and set aside to cool.

Combine cream of mushroom soup, mushrooms, chopped green onions, olives, chili powder, cumin, sour cream and mix thoroughly.

Spray a 9 x 13 pan with cooking spray

Shred cooled chicken breasts

In a flour tortilla place a line of shredded chicken with a line of roasted chilies, pour sauce on top so that the chicken and green chili slice is covered, roll and put seam side down in pan. Continue with this process until the pan is filled. Cover rolled tortilla with grated cheddar cheese, and sprinkle garnish of a few more olives on top.

Bake at 350 for 30 minutes.

Serve with sour cream and guacamole.

Asian Plum Sauce and Zuchinni Fritters


 We managed to save some of the plums from the cockatoos, but they were quickly ripening in the summer heat. 

Asian Plum Sauce to the rescue


 A small revelation.  I am a very poor labeller of my preserves.  I put them on the shelf to finish cooling then forget about them. Chutney can look like jam and this sauce was looking a little close to raspberry. Part of the put off in labelling is fiddling with sticky labels in the printer. These I just printed with our new laser printer on plain copying paper and stuck on with PVA glue. Of course I did forget to date them, but at least I know what's inside.  I think they will disappear pretty fast anyway so the missing date shouldn't be a problem. This was so quick and easy and gives many more possibilities to insert pictures and use different shapes. They'd look prettier with some fabric on top, but I think these few jars are for my eyes only.

 The only downside to the recipe is that there wasn't more. Sieving out the skins does remove a fair bit of bulk.
Asian Plum Sauce
2kg mixed red skinned plums quartered and pitted
200g brown sugar
1 whole star anise
1 tspn cinnamon
2 green chillis finely chopped
200 ml rice wine vinegar
200ml plain white vinegar
100ml XiaoXing Chinese Rice Wine
50g finely grated ginger
4 garlic cloves finely chopped
2 red onions (small) finely chopped
1 white onion (small) finely chopped
8 tbspns light soy sauce and a few good dashes of ketchap manis

Instructions
Forget to read the recipe, and put it all in a pot and leave overnight in the fridge as this sauce making is taking too long.
Realise in the morning that the sugar shouldn't go in until after the fruit has softened. March on ahead with simmering until it is all soft. Lots of simmering - 2hrs or so until very soft - taste and add what you like - more salt, sweet, spice etc...
Sieve out skins pushing with wooden spoon - discard remaining contents of sieve (this felt wrong).  Return to pot and simmer some more - maybe another 2 hrs.  Place a saucer in the freezer.   

To test if it's ready put a teaspoon of sauce on the cold plate - if the sauce stays apart when you run your finger through the middle it's set, if not simmer some more.

When ready place into hot sterilised jars.

If I had my time again I would consider blending the sauce after the hard spices are removed so as to extract maximum goodness and bulk from the skins.

A wonderful morish plum sauce with the spices, ginger and garlic all playing a part. Plum sauce has always been a personal favourite, my mum regularly made it when I was growing up, and it was my sauce of choice as a kid.

Zuchinni
 These are the outcome of seeds I collected from a neighbours regular looking yellow squash last year- they're making the most beautiful Squachinnis.

Zuchinni Round de Nice - a mutato with 3 fruit merged into one.

Like the rest of Victorian's with vegie patches, we are now getting oodles of zuchinnis.  It seems that once they start, there is no end in sight.  We did manage to give away a bag full last week but a whole new lot are awaiting harvest. I'm taunting the kids with threats of zuchinni for dinner each night, and following through on many occasions.
This recipe was a hit, which was lucky as I doubled it and have frozen many leftovers which we've been eating for lunch. Recipe was adapted from here

Zuchinni Fritters
4 small/medium zuchinnis (home grown) grated
4 cups self raising flour
6 eggs (free range from neighbour)
3 garlic cloves chopped finely (home grown)
1 tin of drained corn (fresh would be better but ours is just pollinating)
2 red onions diced finely (home grown)
small bunch of chives chopped (home grown)
1 cup grated cheese
2 cups milk
salt and pepper to taste

Mix all ingredients together, will seem quite sloppy. Fry in olive oil - dollop spoonfuls on bbq, wait until cooked through when turning, cook on medium heat until golden brown.  The BBQ was great for dealing with such a large quantity.


 Not the classiest of food pics.  I only thought of taking a picture after I went back for seconds, so my sauce is all smudgy (it's really thicker than it looks in the picture too). Zuchinni fritters with grilled eggplant (a pretty purple and white Fairy variety) and Asian plum sauce.

We knocked over this bottle in a week.

Delicious ways to eat zuchinni
Grilled plain
Grilled with Dukkah
Grilled with a balsamic vinegar and pine nut glaze
Grated with pasta - 2 versions (fry until just soft)
one with lemon zest, juice, garlic and chilli and another with  
olive oil, garlic, onions, anchovies, chilli
Diceded finely in fried Rice
Chopped in a putanesca sauce.
Vegie Lasagna
 I can also recommend the classic zuchinni slice

I don't reallly like stuffed zuchinnis, they are a bit to mushy for my tastes, but if anyone has a recipe to convert me please forward  it on. In fact please link any special zuchinni recipes you may have.
 Before
Zuchinni growing technique - in November dig grass and a big hole in the ground. Plant mulberry (grown from a cutting bought on Ebay) and surround with newspaper covered with 5 bags of horse manure. Plant zuchinni seeds in pockets of soil  around mulberry - about 3 seeds in each pocket - seeds took about a week to come up - some were fortuitously stolen by cockatoos. Almost all seeds germinated.

 Before

 After - a very happy mulberry and thriving zuchinnis. A great way of establishing a fruit tree as you remember to feed and water it in it's early stages.
 After - rudolph is coverd in deep zuchinni shade.
And the extra patch of squash I had to create because I can't be ruthless with unnecessary seedlings.  Well none have gone to waste yet.


Orange Berry Muffins


This is another Tuesdays with Dorie rewind recipe from the early days of TWD. I decided that starting this week I would start back at the beginning of the book and try to work my way through the recipes that I missed in the order they appear in the book. I'm planning on doing this on the "off Tuesdays" since next week we will start the new TWD group with the book, Baking With Julia (so excited!) and only post every other Tuesday.


The first recipe in the book is Orange Berry Muffins, these sounded so delicious and I was happy to give them a try. I love oranges and blueberries, and the recipe calls for buttermilk, which I love using in baked goods for that extra moist crumb.

Orange Berry Muffins
Dorie Greenspan

Grated zest and juice of 1 orange
About 3/4 cup buttermilk
2 large eggs
3 Tablespoons honey
1 stick (8 Tablespoons) unsalted butter, melted and cooled
1/3 cup sugar
2 cups all-purpose flour
2-1/2 teaspoons baking powder
1/4 teaspoon baking soda
1/4 teaspoon salt
1 cup blueberries - fresh, preferably, or frozen (not thawed) -- I used frozen

Decorating sugar, for topping (optional) -- I skipped this, but kind of wish I wouldn't have


Center a rack in the oven and preheat the oven to 400 degrees F. -- I had my oven temperature at 350, I like my oven temp a little lower when I'm using silicone bakeware, just personal preference -- Butter or spray the 12 molds in a regular-size muffin pan or fit the molds with paper muffin cups. Alternatively, use a silicone muffin pan, which needs neither greasing nor paper cups. Place the muffin pan on a baking sheet.


Pour the orange juice into a large glass measuring cup or a bowl and pour in enough buttermilk to make 1 cup. Whisk in the eggs, honey and melted butter.

In a large bowl, rub the sugar and orange zest together with your fingertips until the sugar is moist and the fragrance of orange is strong. Whisk in the flour, baking powder, baking soda, and salt. Pour the liquid ingredients over the dry ingredients and, with the whisk or a rubber spatula, gently but quickly stir to blend. Don't worry about being thorough - the batter will be lumpy and bubbly, and that's just the way it should be. Just a note, don't leave any clumps of dry flour. Stir in the blueberries. Divide the batter evenly among the muffin cups. I had enough for two pans of heart muffins and a small pan of mini muffins.


Bake for 22 to 25 minutes. If you want to top the muffins with decorating sugar, sprinkle on the sugar after the muffins have baked for 10 minutes. When fully baked, the tops of the muffins will be golden and springy to the touch and a thin knife inserted into the center of the muffins will come out clean. Transfer the pan to a rack and cool for 5 minutes before carefully removing each muffin from its mold.


~~~

I made these as an after school snack for my kids and they loved them warm from the oven. I thought they were delicious too, not too sweet, and can be eaten plain or served with butter and honey. Using frozen berries worked out fine but I bet they'd be even better with fresh. As much of a hit as these were fresh from the oven, the next morning the kids weren't liking them as much, I thought they were just fine, but their texture did change a bit, so I'd plan to serve these fresh. It was so fun to finally try the first recipe from Baking From My Home To Yours :)


Make a Rainbow Tail

As promised, a tail tutorial to go with the Unicorn Horn Flower Crown. This tail is a very simple and quick project, and certainly isn't limited to unicorns or rainbows. Kaia specifically wanted a rainbow tail for her unicorn costume, and I thought keeping the bands of colour separate would have more rainbow impact than the strands all being mixed together. 


You will need: 
  • Yarn
  •  Stick or Large Book
  • Needle and Thread 
  • Cloth Ribbon (Thin and Wide)
  • Tacky Glue (I Used Quick Dry)
  • Belt
We picked out Bernat Mosaic Yarn - Psychedelic, their Calypso version is nice, too. 


This yarn has its colours in long sections, so as I pulled the yarn off the skein I wrapped it into equal lengths. This is pretty easy to do by wrapping your yarn around a book, but Kaia wanted a very long tail, one that came all the way to her feet. I held one end of the yarn in my hand, and wrapped it around a crochet hook I held between my knees, back and forth, between hand and hook, until the yarn started to shift to the next colour. Then I cut it.


Make sure both cut ends come out on the same side, even if it means chopping off a little section of yarn before starting your next colour, so that one end of your yarn has only loops. Use another short length of yarn to go under and around the loop end, and double knot it. Trim the knot ends short, (but not so short that your knot might slip out.) Do this for each colour. You will have a separate bundle for each colour.


Once you are through gathering your colours into bundles, run another, longer, length of yarn through all of them and tie them together. This length of yarn goes through the top loop, just as you did for the separate bundles, right under the short length of yarn you already tied. Now the bundles are all tied together on the inside. Wrap yet another length of yarn a handful of times tightly around the outside of the bundles, just below the knots, and double knot it. This sucker is not coming apart.


Cut the loops off the bottom end of the tail, and trim them more evenly. I hadn't trimmed yet in the following photo, but when I did, I cut it in staggered layers so they wouldn't all be precisely the same length. Cut two short lengths of cloth ribbon and ready your needle and thread.


 Wrap the ribbons loosely over the knotted end of your tail, and tack very securely into place. I sewed through the yarn wrapping the end and all the way through the tail. Okay, I didn't do a very pretty job, but it is very secure, and it will not be visible. These are so you will be able to put the tail on a belt.


Put a little tacky glue on the yarn wrapping the knotted end of the tail, and put the wide cloth ribbon around it. Make sure the seam is where you want the underside of your tail will be.Turn the cut end of the ribbon under before tacky gluing it down, and then stitch it in place. My ribbon was wider than I liked, so I actually turned the long edges of it under as well.


Your tail is ready to thread a belt through!


Kaia is as happy as can be with her new unicorn outfit, and I really like the way tying each colour individually keeps the colours in distinct bands. Honestly, I think I would still tie smaller bundles even if I were making it all one colour, just because of how much more securely attached the strands of yarn are this way.


We need to find a better belt for her, but tiny belts are hard to find! We have improvised for now. It doesn't come quite to the floor as she had asked, but I didn't want her, or anyone else, stepping on it and tripping her up, so I made it a bit shorter and she has yet to complain. ;)


She's been galloping around non-stop, and if I thought it was hard to get her to stand still for photos in her headband, it was next to impossible in the full getup!


Her tail has stood up to being brushed no problem, with not a single strand lost.


As always, I would love to know if you tackle this project, and especially if any part of the tutorial is not clear. In case you missed it, I linked up to the unicorn horn flower crown at the beginning of this post. They make a fun set!

(I am sharing this post at The Magic Onions and Frontier Dreams, two sites that give me happy warm fuzzies <3 )