simple sweet saturdays...

Today was the last dance class for this season. I really think the girls learned a bit about themselves or simply just gained a little courage by taking this class. It took them about three weeks to settle in, but after that they were happy, independent dancers that enjoyed learning new things. It was nice to watch them gain comfort and confidence by trying something new.  

These Saturday morning were not just about dance class ,we always seemed to make an outing out of it! Near the recreation center where the dance class was held there was the best park ever and at this park lived many, many Rolly Pollys. Ellie figured out pretty quick that if she touched these creatures they would roll up in a ball and she could fling them across the side walk. She loved her little friends that waited for her outside her dance class.
After we managed to roll up as many Rolly Pollys as two toddlers could handle we would share a  picnic lunch before we headed to the ultimate attraction the Tire Swing!
I really looked forward to these Saturdays, so simple yet so sweet!
I believe swim lessons are the next organized recreational activity for the girls, lots to look forward too!

Strawberry Chocolate Cake Bites

Strawberry Chocolate Cake Bites
The following recipe is the result of my attempt to make a light dessert to go with some rich enchiladas suizas I made for some guests last night.  My plan, and what we did eat was strawberry shortcake.  I wanted chocolate, though, so I whipped up some chocolate ganache to use on the side, or as an extra topping for the shortcake.  Mmmm...chocolate tastes good with strawberry shortcake.  I decided today to stack the ingredients for a cute bite-size dessert.  My sister-in-law liked it too, but thought it might taste better with some whipped cream, so I suppose you could put that on the side for dipping.  I think that would be awesome as well.  For now, this is what I've done, and this is what I have pictures of.  At any rate, these are a nice addition to my growing collection of miniature desserts.
By the way, the amounts below are my best guess.  You might end up with too much of one ingredient or another, but each is so yummy on its own, I doubt you'll have trouble finding a reason to eat them.

Strawberry Chocolate Cake Bites

Ingredients:
48 one-inch cubes of angel food cake
12 medium to large strawberries, cleaned, hulled, and quartered
4 oz. tasty dark chocolate (I use Dove Dark Chocolate), coarsely chopped
1/2 cup heavy cream
1 tablespoon unsalted butter

Directions:
Place chopped chocolate in a medium sized heat-proof bowl.  In a small saucepan over medium heat, bring cream and butter to a simmer.  Once cream/butter has come to a simmer, pour over the chocolate and let sit for about 10 minutes.  Stir chocolate and cream with a rubber/silicone spatula until completely mixed.  Set aside to cool to a pudding-like consistency, about an hour and a half to two hours, if room temperature is about 70 degrees Fahrenheit.

Once the chocolate ganache (chocolate and cream mixture) is the right consistency, spoon about 1/2 to 1 teaspoon onto each angel food cake cube.  Pierce a strawberry quarter with a toothpick so that about half an inch extends beyond the bottom of the piece of strawberry, and then poke into the chocolate-topped cake cube.  Pop one in your mouth to see if they taste good.  They do.

Makes 4 dozen.

Not Quite Red Velvet Whoopie Pies


It's my turn to host for Club: BAKED!  I thought it would be fun to give these Red Velvet Whoopie Pies a go and then forgot to add the red food coloring, go figure!  So here are my Brown Velvet Whoopie Pies :) I've never had or made whoopie pies before although I see them all over. They've always looked like a fun treat to me and now I know that they are!


These were a big hit with my whole family, they are definitely a delicious treat and quite easy to make! I loved the cream cheese frosting and walnut combo. Thanks for baking along with me this week, I hope you all had fun with this recipe and I can't wait to check out your red desserts :)


Red Velvet Whoopie Pies
Baked Explorations
Yield:10-12 large or 15-17 small pies

For the Whoopie Pies
2 1/2 cups all purpose flour
3 tablespoons dark unsweetened cocoa powder ( like Valrhona)
1/2 teaspoon baking powder
1/2 teaspoon baking soda
1/2 teaspoon salt
1/4 cup canola oil
1/2 cup plus 2 tablespoons buttermilk
1/2 cup butter (1 stick), softened, cut into pieces
1 tablespoon vegetable shortening, at room temperature
3/4 cup firmly packed dark brown sugar
1/4 cup granulated sugar
1 large egg
1 teaspoon pure vanilla extract
1 tablespoon red gel food coloring

For the Cream Cheese Filling
3 cups confectioners' sugar
1/2 cup (1 stick) unsalted butter, softened
8 ounces cream cheese, softened
1 teaspoon pure vanilla extract
1/4 teaspoon salt

For the Assembly
1/2 cup toasted walnuts,chopped coarsely


Make the Pies


Preheat the oven to 350 degrees F. Line two baking sheets with parchment paper.


In a large bowl, sift together the flour,cocoa powder, baking powder, baking soda and salt.


In a small bowl, whisk together the canola oil and buttermilk.


In the bowl of an electric mixer fitted with the paddle attachment, cream the butter and shortening until smooth. Scrape down the bowl and add the sugars. Beat until the mixture is light and fluffy, about 5 minutes. Add the egg and vanilla extract and beat until combined. Scrape down the sides and bottom of the bowl, add the red gel food coloring, then mix on low speed for a few more seconds to incorporate. Do not over mix.


Turn the mixer to low. Add the flour mixture, alternating with the buttermilk mixture, in three separate additions, beginning and ending with the flour mixture until just combined. Scrape down the sides and bottom of the bowl , then mix on low speed for a few more seconds.


Cover with plastic wrap and chill the batter in the refrigerator for about 15 minutes.


Remove the batter from the refrigerator. Us a a small ice cream scoop with a release mechanism to drop heaping tablespoons of the dough onto the prepared baking sheets about 1 inch apart. Bake for 10-20 minutes, until the cookies are just starting to crack on top and a toothpick inserted into the center of a cookie comes out clean. Let the cookies cool completely on the pan while you make the filling.


Make the Cream Cheese Filling


Sift the confectioners' sugar into a medium bowl and set aside.

In the bowl of an electric mixer fitted with the paddle attachment, beat the butter until it is completely smooth. Add the cream cheese and beat until combined.


Add the confectioner's sugar, vanilla, and salt and beat until smooth. Be careful not to over beat the filling or it will lose structure. (The filling can be made 1 day ahead. Cover the bowl tightly and put it in the refrigerator. Let the filling soften at room temperature before using.)


Assemble the Whoopie Pies


Spread the walnuts in an even layer on a small plate.


Turn half of the cooled cookies upside down (flat side facing up)


Use an ice cream scoop or a tablespoon to drop a large dollop of filling onto the flat side of the cookie. Place another cookie, flat side down, on top of the filling. Press down slightly so that the filling spreads to the edges of the cookie. Turn the whoopie on its side and roll through the walnuts. Repeat until all the cookies are used. Put the whoopie pies in the refrigerator for about 30 minutes to firm up before serving.


The whoopie pies will keep for up to 3 days on a parchment lined baking sheet covered with plastic wrap, in the refrigerator.


Cousins-to-be

My sister's fiancee and his kids were in town today.  I knew the kids when they were little, but have not been around them in years.  It was fun to get to know them again.  I was reminded of what great kids they are. 

We went out for lunch at Brandon's favorite restaurant.  Then we went to Granny and Poppy's.  Eymber turns 14 this week, so we celebrated her birthday with carrot cake and presents.
My parents had taken Eymber to an art store earlier this week and let her stock up on pens and pencils and sketchbooks.  She spent the whole afternoon drawing.  She is an amazing artist and draws constantly - even on her straw wrapper at lunch!

Granny had plans for all the soon-to-be-cousins to get to know one another.  Granny has long been known as the Bubble Lady and she discovered a fun new way to play with bubbles.
Cut off a plastic bottle and secure a washcloth over the bottom with a rubber band.  Dip in bubble solution and blow.  Such fun!
The bubbles come out in long tubes.
Orion was the first to realize that these bubbles could be a great beard.
At 12, he is in that awkward place between child and teen.  Today, he was happy to just be a kid.  Rachel followed him around and charmed him into playing with her.  She kept running over to me and announcing "I like Orion!"
Anthem used his bubbles to make sculptures.
Granny and Robie got in on the bubble fun, too.
The kids played together all afternoon.  Rachel kept Orion occupied.  Katherine and Anthem ran around, flitting in occasionally to ask unusual questions like "Why is 11 called 11?"
It was a fun day.  And I'm looking forward to more cousin time in the future.


Enchiladas Suizas

Enchiladas Suizas with rice and beans
Enchiladas Suizas hot out of the oven
This is a dish that my non-casserole-eating husband requests on occasion.  They are rich, mild, and so, so good.  The recipe comes from my favorite recipe webiste, Allrecipes.com.  Love that site.  Anyway, I'm on my way to Zombie Burger and don't have much time to write my little paragraph here.  If I wasn't on my way to Zombie Burger, I would be eating these leftovers.  Maybe tomorrow for lunch.  
Try these.  You'll like them.
*Side note update on Zombie Burger.  Yesterday was my first visit to the hip, new Zombie Burger, and I have to say I was pleasantly surprised.  My kids were weird and didn't totally love it--maybe the zombie theme freaked them out and dampened their appetites.  At any rate, I ordered the Walking Ched: breaded & deep fried macaroni & cheese "bun," bacon, cheddar cheese, caramelized and raw onion, and mayo.  Oh my gosh, it was good!  Of course, I couldn't eat the whole thing, but I'm glad I ordered it, and that's saying a lot from this picky eater.  My Walking Ched even had admirers as the two guys at the table next to ours kept looking over at my plate and finally asked how it was.   Good times.  Good food.  I love them.


Enchiladas Suizas
    ---adapted from Allrecipes.com

Ingredients

  • 2 tablespoons butter
  • 2/3 cup chopped onion
  • 2 tablespoons all-purpose flour
  • 1 1/2 cups chicken broth
  • 2 cans (4 oz. each) diced green chiles (NOT jalepeno)
  • 1 clove garlic, minced
  • 3/4 teaspoon salt
  • 1 dash ground cumin 
  • 12 (8 inch) corn tortillas
  • canola oil for frying
  • 1 cup shredded Monterey Jack or Pepper Jack cheese
  • 1 cup shredded mild Cheddar cheese
  • 2 cups shredded, cooked chicken breast meat
  • 1 cup heavy cream
  • 1/4 cup chopped green onion

Directions

  1. Prepare salsa verde: Melt butter in saucepan over medium heat. Saute the onion until soft. Stir in the flour. Add the broth, then add the chiles, garlic, salt, and cumin. Simmer about 15 minutes to blend flavors, then set aside. Preheat oven to 350 degrees F (175 degrees C.)
  2. In a heavy skillet, lightly fry tortillas in shallow oil, being careful not to make them too crisp to roll. Combine the cheeses and keep 1/2 cup aside for topping. Dip each tortilla in salsa verde (both sides.) Place 2 heaping tablespoons chicken and about 2 tablespoons cheese down the center of each; roll and place seam side down in a shallow 9 x 13 dish.
  3. After all the rolled tortillas are in the dish, spoon additional salsa verde over them and then cover evenly with heavy cream. Sprinkle with remaining 1/2 cup cheese mixture, and with the green onions.
  4. Bake uncovered in preheated oven for 20 minutes. Serve immediately.


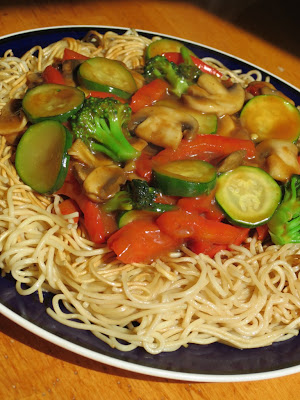
Fried Noodle Cake with Hoisin Vegetables -- Random Recipe #8


Doesn't this look yummy?  I really lucked out with this week's Random Recipe!  My randomly selected cookbook was Pillsbury Classic Cookbooks #198, Stir-Fries Cookbook from August 1997. 


I've had this book for many years and have never cooked anything from it.  My randomly selected recipe was...


Twice-Cooked Noodles with Hoisin Pork.  Since I don't eat pork I swapped out the pork and added extra veggies (the same amount of veggies by weight as was called for with the pork).  The recipe also includes "purchased stir fry sauce" and I made my own.  I grew up eating stir fries all the time and I don't remember ever buying a sauce. This one called for garlic ginger stir-fry sauce, so here is a quick and easy home made version, you can just up the ingredients if you want a bigger batch of sauce and vary the spices to taste, I usually add some Chinese Five Spice powder but kept this one simple since it was to go with the hoisin sauce...

Quick and Easy Homemade Stir Fry Sauce
double if desired, this makes enough for one small stir-fry

1/2 cup vegetable broth
2 tbsp soy sauce
1/4 teaspoon garlic powder (or minced garlic)
1/2 teaspoon powdered ginger (or minced fresh ginger)
1 tbsp cornstarch

Whisk together all ingredients thoroughly, add to cooked vegetables in hot wok and stir for 30 sec - 1 minute until thickened and glossy. To use it in this recipe just whisk it all together and add it in when the recipe says to add stir fry sauce to the wok.


Twice-Cooked Noodles with Hoisin Vegetables
adapted from Pillsbury Stir-Fries Cookbook

8 ounces uncooked fresh Chinese noodles or angel hair pasta, broken into 2 inch pieces (I used a 10 ounce package of lo-mein noodles)
1 tablespoon soy sauce
1 tablespoon sesame oil
3 tablespoons peanut oil (I used vegetable oil)
1 and 1/4 pounds mixed fresh vegetables, cut into like sized pieces -- I used 1 red pepper, about 6 mushrooms, about a cup of broccoli florets, and 1 small zucchini
1/4 cup water
1/2 cup stir fry sauce (see recipe above)
1/4 cup hoisin sauce

Cook noodles as directed on package. Drain well. In large bowl, combine cooked noodles, soy sauce, and sesame oil.


Heat 1 tablespoon of the peanut or vegetable oil in a large nonstick skillet or work over medium0high heat until hot.


Add noodle mixture, pressing to form pancake, cook 8 to 12 minutes or until bottom of noodle pancake is
golden brown.


Slide pancake from skillet onto plate (this is a little tricky); invert pancake onto another plate, browned side up. Add another 1 tablespoon oil into skillet or wok. Slide the noodle pancake into skillet, browned side up; cook 4 to 6 minutes or until bottom is browned. Slide onto serving plate, cover to keep warm.
In same skillet or work, heat remaining 1 tablespoon oil until hot, add veggies and stir to coat.


 Add water and cook 6 to 8 minutes until veggies are crisp tender,stirring occasionally. Stir in stir fry sauce and hoisin sauce. Cook 1 to 2 minutes until thoroughly heated and sauce has thickened and is glossy.


To serve, with sharp knife or kitchen scissors, cut hot noodle pancake into wedges. Top pancake with vegetable mixture.

~~~~~


This was probably my favorite Random Recipe so far! It was such a delicious lunch even though it was a bit tricky to get the noodle pancake just right. One of my very favorite things at one of my favorite Chinese restaurants is called Pan Fried Golden Noodle and it is pretty much this recipe! It is not on a lot of Chinese restaurant menus and I'd never tried to make it at home because I never thought I'd be able to find the right type of noodle but the lo mein noodles I tried were very similar to the restaurant noodles.  I will be making this one again for sure, some crunchy tofu would be perfect with this.  Although it is a bit time consuming for lunch, it was worth it :)


I'm sending this off to Sue for Cookbook Sundays and also to Ruth at Once Upon a Feast for Presto Pasta Nights #258.

Greek Bean Soup and White Milk Bread


I can't believe we are done cooking Tessa Kiros' recipes over at I Heart Cooking Clubs this week!  When we started with Tessa, I honestly hadn't even heard of her, so checked out two of her books from the library -- Apples for Jam and Falling Cloudberries, the only two of her books available in our state library database!  As soon as those were returned I knew I would enjoy her books so bought them all over the past six months. I think my favorite would have to be Food From Many Greek Kitchens since I've always loved Greek food and didn't know too much about it. I also loved Twelve and Apples for Jam, although all her books are gorgeous.


This simple recipe for White Milk Bread (or rolls) is from Apples for Jam...


White Milk Bread


1 cup warm (comfortable to your fingers) milk
One 1/4 ounce package active dry yeast
1 teaspoon honey
3 and 2/3 cups bread flour
1/2 teaspoon salt
1 egg, lightly beaten
3 tablespoons butter, melted


Put the milk, yeast, and honey in a small bowl and stir until the honey melts. Leave it for about 10 minutes, or until it begins to froth a bit. Put the flour and 1/2 teaspoon salt into a larger bowl. Add the yeast mixture, the egg, and butter, and mix through well. Knead 10 minutes or so and, if it seems sticky, just hold the bowl firmly and move the dough around with your hand, rather than adding more flour. Cover the bowl with a cloth and leave in a warm, draft free place to rise for 1 and 1 1/2 to 2 hours until it has puffed up well.


Lightly grease a 12 by 4 inch loaf pan and dust it with flour. Punch down the dough to flatten it and shape it into a rough loaf of a size to fit the pan. Cover with a cloth and leave in the warm place for another 45 to 60 minutes, or until it puffs right up in the pan. Meanwhile, preheat the oven to 375.


Put the pan in the oven and bake for about 25 minutes, or until the top is firm and crusty and the loaf sounds hollow when tapped. Remove from oven, knock the loaf out of the pan, and cool on a rack in a fly-free zone. This is best sliced warm and spread with butter, but you can keep the loaf for a few days in an airtight container (not a plastic bag) for excellent toast.  Makes one large loaf or about 18 small rolls.


Fasolada -- White Bean Soup
Tessa Kiros -- Food From Many Greek Kitchens

1 pound 2 ounces dried butter (or cannellini, haricot, navy) beans -- I used navy
3 garlic cloves, 1 whole, 2 chopped
1 bay leaf
1 small celery rib
1/2 small onion -- I left this off and used a little onion powder
salt
1/4 cup olive oil
1 large onion, chopped
3 carrots, peeled, cut into nice chunks
14 ounce can chopped tomatoes
freshly ground black pepper

Below is the fresh vegetable topping which I skipped...
1 and 3/4 ounces red or green onions coarsely chopped
1/2 cup very coarsely chopped Italian parsley
1/4 cup chopped celery leaves
best-quality olive oil, for serving

Cover the beans with plenty of cold water and soak overnight. The next day, drain and rinse them, and put into a pot with cold water to cover. Bring to a boil, skimming off and scum that has formed. Drain and rinse again. Wipe and scum that has collected on the pot, then return the beans to it. Add 8 cups of cold water, the whole garlic clove, bay leaf, celery rib, an the 1/2 onion. Simmer, partly covered, for about an hour, until tender. Larger beans will take longer and need more water. Add salt in the last 10 minutes or so.

Meanwhile, heat the oil in a soup pot over medium heat and saute the chopped onion until soft and golden. Add the chopped garlic and carrots and when the garlic smells good, add the tomatoes. Season with salt and pepper. Swish about 1/2 cup of water in the tomato can and pour into the pot. Put the lit on and simmer for 10 minutes or so. When the beans are ready, pour them and their water in with the tomato sauce. Simmer for 10 minutes, adding a little water if it's too thick. Ladle into bowls and serve with red onion, parsley and celery leaves on top, a drizzle of oil and a grinding of pepper.

~~~

Both the bread and soup were delicious.  My whole family loved the bread and the leftovers made perfect French toast bread. I was a big fan of the soup. The rest of the family thought it was okay, they are their bowl for Saturday lunch but did not want seconds or left overs. Which means that I ate the left overs for about a week myself, but didn't mind one bit.  I had never heard of Fasolada before and when I was looking it up online it was neat to find that it is considered the national soup of Greece, and that it is available in cans there already made! It was nice to use some of my huge bean stockpile and I would make this again but probably a half batch since I was the only real fan.


Since this is the last Tessa Kiros I Heart Cooking Clubs week, I thought I'd share my personal favorite recipes...a lot of these weren't big hits with picky husband or the kids, but I loved them :) Here are my top five in no particular order...

1. Ricotta Gnocchi with Tomato Pesto -- This was my first Tessa recipe, so yummy!

2. Whole Wheat Apple and Pluot Pie -- This was a hit with the kids and I loved using apples we had just picked at the orchard.

3. Winter Squash Pizza Bake -- I was the only one who really liked this but it had such a neat flavor combo that really got me.

4. Greek Almond Halva -- this was another one that only I liked, but it was so yummy, I'm just waiting for an occasion to make another batch! 

5. Tuscan Baked Eggplant -- this was so yummy, I wanted to make batch after batch of this one, a must try for eggplant fans!

I had a great time cooking and baking along with the I Heart Cooking Clubs crew and can't wait to start on our next adventure cooking with Rick Bayless :)

Simnel Muffins

When I started blogging it was with the intention of trying new recipes and being a little more adventurous with my baking. I certainly think it has helped me to achieve this...however, with regard to these simnel muffins, I've made them for the last 4 years in a row and they really are delicious and a firm favourite...so I thought that I'd share them with you!

As the recipe says traditional simnel cake can be a bit too rich - instead, try these light little muffins with a gooey nugget of marzipan baked in the centre. Now I'm not the biggest fan of marzipan but these muffins just taste like they have a soft almond paste inside. They're also beautifully spiced and the fruit is infused in orange juice and the icing has orange juice in too. It all marries together perfectly to give a muffin that will surprise your friends and it will be sure to bring you compliments...have I sold them to you yet? ;-) Why not give them a try...there's still a week until Easter!
Ingredients

250g mixed dried fruit
Zest and juice of one medium orange
175g butter
175g golden caster sugar
3 eggs
300g self-raising flour
1 tsp mixed spice
1/2 tsp freshly grated nutmeg
5 tbsp milk
175g marzipan

Icing

200g icing sugar
2 tbsp orange juice
Mini eggs

Put the mixed fruit and orange juice and zest into a bowl, you can then either leave it to soak for an hour or pop it into the microwave for 2 minutes on medium. Heat your oven to 180c/160c fan/gas 4.

Mix the sugar, flour, butter, eggs, milk and spices together in a separate bowl, the mixture should be nice and light and fluffy. This could take around 3-4 minutes. Once you reach this stage stir in the fruit.

Half fill each muffin case with a little mixture and then place a disc of marzipan on top of each. If you want to be really accurate/pedantic each ball of marzipan will be about 14g... but I think 10g could also be sufficient if marzipan is not your favourite. You should roll the marzipan into a ball and then flatten into a disc with your thumb. Make sure your marzipan isn't too close to the top, otherwise you'll end up with a marzipan volcano flowing out as they split asunder! Finally, spoon the remaining cake mixture over the top. Bake for 25-30 minutes...your muffins should be golden in colour.

Once cool you can then add the finishing touch. Mix the icing sugar and orange juice together, it should be a fairly thick consistency. Drizzle over each muffin and then top with a cluster of mini eggs.

* Adapted from 101 Cakes & Bakes (Tried & Tested Recipes) from BBC Books and GoodFood Magazine


resurrection garden

i saw this idea in a magazine a few years back and it has been stuck in my memory and this year we finally got around to making it.

materials~ 
a shallow pot about 12" in diameter
one small pot potting soil
wheat grass seeds (soak the seeks for 24 hours before adding them to the dirt)
a rock large enough to cover the opening of the smaller pot. 

we first read one of the kid's Easter books. we talked about where they took Jesus after he died on the cross.
we went outside and filled the larger pot with dirt. the smaller pot, was used to make the cave. we used water during the process to mold the dirt into the right shape.
then we added the seeds.
our garden is growing!   easter week, we will add 3 crosses to the garden.

Ellie Speak!

Sometimes it's the simplest of activities that are the funniest! After picking the girls up from day care after work one day last week, we went for a walk down by the bay. As we were walking Ellie was full of one liners that had me cracking up. First, she saw this bunny (pictured below), but of course it was no regular bunny because it is only two weeks away from Easter so of course to Ellie it has to be the Easter Bunny. She's yelling at the 'Easter' Bunny "PLEASE bring me Eggs and lots of Chocolate, Lola wants Chocolate too!" While wrapping up our walk, I hear Ellie yelling something again- I think she is talking to another bunny, but I couldn't quite make out what she was saying. I stop walking to listen and she is screaming at the top of her lungs, "STOP winding trees, TREES STOP winding!" I conclude that Ellie is not a fan of the windy afternoon and it was probably time to wrap up our walk, but not before I ask her to repeat that statement a few more times so I can laugh a few minutes longer.
I LOVE toddler speak and know I will miss it when it is gone!