Coconut Butter Wedges -- Tuesdays with Dorie

Time for Tuesdays with Dorie! This week's recipe, Coconut Butter Thins, was picked by Jayne of The Barefoot Kitchen Witch, thanks Jayne! The add-ins for this recipe are two my favorites, macadamia and coconut -- yum! We didn't have any macadamia nuts so I asked my husband to pick some up at the store and he came home with two pounds of them!!


I don't know why I put off baking these until the last minute but I did. And I know these were supposed to be Coconut Butter Thins but I ended up with Coconut Butter Wedges -- I changed the baking 'method,' instead of the rolling out in a bag and doing squares I decided to pat the dough into the bottom of my 10 inch springform pan, then cut the cookies into wedges.


I love 'wedge cookies' and after reading the P&Q regarding these I noted that some people had spreading issues with these and some people had shortbread style cookies. When I first read the recipe I expected spread out lacy cookies because Dorie mentions how fragile these cookies are, but I must admit I prefer the shortbread consistency over lacy cookies, and since these were going either way with the TWD bakers I didn't feel too guilty deviating from Dorie's directions and baking them like I did.


Here are the other things I did with this recipe...my two sticks of butter went straight from the fridge to the microwave to soften for 20 seconds because it was late and I forgot to leave butter out at room temperature, oops! I totally skipped the chilling of the dough for these and just hoped for the best. I turned *up* the oven temperature for this recipe (I'm always changing around oven temps but usually lowering them) -- I started out at 350 for 20 minutes, then went to 375 for 8 minutes to finish them, I was periodically checking and just took them out when I felt they looked done.


I will make sure to try them 'as written' per baking instructions next time, as for ingredient changes, the only swap I did was to switch lime zest for lemon. And I do love lime, so will try that again on my next bake of these, I just happened to have a lone lemon left from my last bag of lemons and wanted to use it up.

These cookies were amazing! Probably my personal favorite TWD cookie we've made so far. The flavor was just perfect and the texture was not too hard or crunchy, but more soft and chewy, with nice bits of crunch from the macadamia nuts. I can see making these again often, yum!

Sunshine!


Sunshine Cuddle Baby

Recently I found this beautiful sunny yellow coloured velvet fabric and in honour of the first very longed for springtime shafts of sunlight I made this sunshine cuddle doll.

Fluffy Lemon Sour Cream Muffins


We were in a muffin mood, so I took out one of those mini cookbooks you get in the checkout aisle at the grocery store. This one was called The Muffin Cookbook, Muffins for All Occasions -- perfect! I browsed the recipes, looking for something the kids would like but wasn't too fussy or sweet, and that called for ingredients I already had on hand. I noticed a recipe for Sour Cream Lemon Muffins and changed it up a bit to use what we had on hand and was so pleased with the result!

Fluffy Lemon Sour Cream Muffins

2 cups all purpose flour
1/2 cup sugar
1 tablespoon baking powder
zest of one lemon
1/2 teaspoon salt
1/2 cup sour cream
1/2 cup skim milk
1/4 cup melted and cooled butter (half stick)
1/4 cup melted and cooled margarine (half stick)
1 egg

Preheat oven to 350. Prepare muffin tin (butter or paper line or spray with cooking spray, I always use cooking spray, Crisco with Flour No-Stick Spray or Baker's Joy are my favorites.)

In large bowl combine flour, 1/2 cup sugar, baking powder, lemon zest, and salt. Whisk together until well combined.

In small bowl whisk together sour cream, egg, milk, and melted and cooled butter and margarine.

Gently stir the wet mixture into the dry mixture until combined, you will have a thick muffin batter.

Spoon into muffin cups, this will make about 12 regular muffins or 6 jumbo muffins. * I actually doubled the recipe and made one pan of jumbo mini bundt muffins and 8 mini loaves.

Bake for about 17 minutes for regular muffins, about 25 for jumbo muffins. Just peek through the oven door window and check, these don't get very dark but will have a few golden brown flecks.

Remove from oven and gently remove from pan and let cool on wire rack. Serve warm for best texture.

We absolutely loved them, they are up there with the lightest fluffiest muffins I've ever had! They were delicious with some butter and honey, and with butter and jam the next morning for breakfast, although they were not quite as fluffy as warm from the oven they were still tasty.


After seeing my blogging friend Natashya's yummy submission to Bread Baking Day #18 Quick Breads I knew I would love to participate in this event as I love bread baking, be it savory, sweet, quick, or yeast, so here is my first of hopefully many submissions to a Bread Baking Day event :)

Lasagne of Emilia-Romagna -- Daring Bakers


Time for the Daring Bakers Challenge! This month we tackled home made lasagna, with spinach pasta, yum! I have to tell you that spinach fettuccine with alfredo is one of my favorite meals ever, so I was really excited to try a lasagna with spinach noodles. This lasagna is less cheesy than the usual American lasagna I'm used to, with lots of mozzarella and ricotta, but it is still delicious. The main components are the fresh spinach pasta, a bechamel sauce with a touch of nutmeg (yum!), and a red sauce (vegetarian), layer after layer of delicious pure pasta goodness melded together with the yummy sauces, what's not to love? I'm sorry to say I did not get very many photos, or photos that I really love, but I did manage to snap a few...the first photo of this post is after the left-over lasagna had been in the refrigerator over night and rewarmed.


here is the dough while resting (it is bright green because I used the flash, but it really did look like that in person compared to the pale green non-flash pasta photos)

Here was my pasta station, roll, roll, roll! I do own the lello pastamaster 3000 and love to make as much of my own pasta for every day use as possible, but of course some days I still use boxed pasta. Anyway, even though I have the lello lasagna extruder disc I decided to get out the old hand crank model for this challenge :)

Here is my biggest complaint of the day -- and it has nothing to do with the recipe -- the above photo shows the pasta sheet going through my "curly lasagna attachment." This was my first time using that attachment, I bought it a couple of months ago to add to my hand crank attachment set, partly because it was on sale, and partly because we really love the curly ruffled edges of boxed lasagna and I was looking forward to creating that at home. It didn't turn out anything more that a pasta sheet barely cut with a little wavy design! How disappointing! I could get better wavy cuts with my pastry cutting wheels! Oh-well!


starting to layer the lasagna

And lastly a couple of finished lasagna shots, above is a huge bubble up of pasta that I thought was pretty fun, did anyone else have this? I love the 'bubble' pieces of pizza for some reason and just had to take a picture of my 'lasagna bubble.' Thank you for visiting my Daring Bakers post for March -- The March 2009 challenge is hosted by Mary of Beans and Caviar, Melinda of Melbourne Larder and Enza of Io Da Grande. They have chosen Lasagne of Emilia-Romagna from The Splendid Table by Lynne Rossetto Kasper as the challenge.

Painting with Jello

Today we painted using jello. It was a sticky but wonmderful smelling paint. Since we are talking about rain we and rainbows we used different flavor jellos to make a rainbow.


fresh eggs 101

more signs of spring are slowly creeping into our lives. The arrival of daffodils, forsythia, iris and eggs took place this month.

fresh eggs

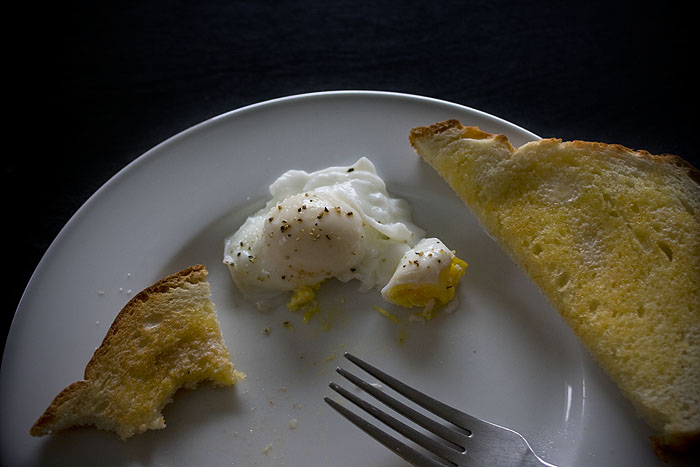
Simple, easy breakfasts have returned... poached eggs and toast. When eggs are fresh, I think this is the best way to cook them. Poaching requires no added oils, so you can appreciate their flavor to the fullest. Poaching takes a short amount of time and no special equipment. A pan of slow boiling water and a slotted spoon are all you'll need to create perfectly poached eggs. Simply crack your egg open and use one half of the shell to cradle the egg. Bring the shell down to the water's edge and slide it's contents gently into the water. It will sink down to the bottom of the pan. No need to touch it at this point, unless the whites are scattering too much, which won't happen if you're using really fresh eggs. If they do scatter a bit, just use the slotted spoon to gather them up close to the yolk. Boil for 2-5 minutes, depending on how firm you like your yolk. Most days I like a 4 minute egg. With these small banty eggs this creates a slightly firm yolk. When the egg(s) float to the top, they're soft poached. They'll float up in 3 minutes with the banty eggs. Make sure you use the slotted spoon to fish them from the water.

breakfast

Creating a breakfast suited for company?... or want something special?... poaching is the first step to fabulous dishes like Eggs Benedict, Eggs Florentine or ...Eggs Maryland, Waldorf Style Eggs, Norwegian Eggs, Artichoke Eggs, Eggs Blackstone, Asparagus Eggs or Country Eggs Benedict. Go ahead, you deserve it!

Now that you've become a pro poacher, you can poach nearly anywhere. Over a camp stove, on the barbeque, on your car engine, using a magnifying glass in the sun. Anywhere you can boil water, you can poach an egg. The possibilities are endless!

tulip

Tomato and Goat Cheese Tarts -- Barefoot Bloggers


Our second Barefoot Bloggers recipe of March is Ina's Tomato and Goat Cheese Tarts, picked by Anne of Anne Strawberry, thanks Anne! I changed this recipe up a little bit, Ina's recipe uses a puff pastry crust and I was more in the mood for a crunchy traditional tart crust. I've been on a pistachio kick lately so I fiddled with a tart dough recipe and added pistachios. Perfect!


I also swapped out onions for mushrooms, parmesan for pecorino romano, used plain goat cheese and cherry tomatoes. These were a wonderful grown-up savory treat. Here is Ina's recipe -- it is so versatile and I think it welcomes any changes to personalize these yummy tarts.

Tomato Goat Cheese Tarts

1 package (17.3 ounces/2 sheets) puff pastry, defrosted
Good olive oil
4 cups thinly sliced yellow onions (2 large onions)
3 large garlic cloves, cut into thin slivers
Kosher salt and freshly ground black pepper
3 tablespoons dry white wine
2 teaspoons minced fresh thyme leaves
4 tablespoons freshly grated Parmesan, plus 2 ounces shaved with a vegetable peeler
4 ounces garlic-and-herb goat cheese (recommended: Montrachet)
1 large tomato, cut into 4 (1/4-inch-thick) slices
3 tablespoons julienned basil leaves

Unfold a sheet of puff pastry on a lightly floured surface and roll it lightly to an 11 by 11-inch square. Using a 6-inch wide saucer or other round object as a guide, cut 2 circles from the sheet of puff pastry, discarding the scraps. Repeat with the second pastry sheet to make 4 circles in all. Place the pastry circles on 2 sheet pans lined with parchment paper and refrigerate until ready to use. Preheat the oven to 425 degrees F.

Heat 3 tablespoons of olive oil in a large skillet over medium to low heat and add the onions and garlic. Saute for 15 to 20 minutes, stirring frequently, until the onions are limp and there is almost no moisture remaining in the skillet. Add 1/2 teaspoon salt, 1/4 teaspoon pepper, the wine, and thyme and continue to cook for another 10 minutes, until the onions are lightly browned. Remove from the heat.

Using a sharp paring knife, score a 1/4-inch-wide border around each pastry circle. Prick the pastry inside the score lines with the tines of a fork and sprinkle a tablespoon of grated Parmesan on each round, staying inside the scored border.

Place 1/4 of the onion mixture on each circle, again staying within the scored edge. Crumble 1 ounce of goat cheese on top of the onions. Place a slice of tomato in the center of each tart. Brush the tomato lightly with olive oil and sprinkle with basil, salt, and pepper. Finally, scatter 4 or 5 shards of Parmesan on each tart.

Bake for 20 to 25 minutes, until the pastry is golden brown. The bottom sheet pan may need an extra few minutes in the oven. Serve hot or warm.


starting to saute the mushrooms


the pistachio tart crust before baking


I pre-baked the tartlet crusts for about 10 minutes at 375, here they are at the topping station :)

I think I should have added some more mushrooms, I had some left too, I just was too skimpy putting them on


almost ready to bake... and done!


These were delicious and I had a fun time putting them together. I loved them, even though I was the only person in our home remotely interested in eating anything with goat cheese and tomato (silly picky family), I would still make these again :) I can't wait to try some other adaptations of this versatile recipe -- and I really do want to try this as written with the puff pastry at some point, promise!

Macaroni and Cheese with Flower Pasta for Spring

Macaroni and Cheese -- Tyler Florence

1/4 cup flour
1 stick butter
1 quart whole milk
2 pounds sharp cheddar
1 pound elbow macaroni (or shaped pasta), cooked and drained

Preheat oven to 350 degrees. In a 2quart saucepan, melt butter then incorporate flour to make roux.

ghost whisk

With a wire whisk slowly pour in milk, whisking vigorously to avoid lumps. Once milk is incorporated, sauce is made. Simmer for ten minutes to remove flour flavor. Finally fold in two pounds of grated cheddar.

Season with salt and pepper.

In a large mixing bowl (I just added the macaroni into the cheese sauce pan) combine elbow macaroni with cheese sauce. Mix well. Pour into casserole pan and bake at 350 degrees for thirty minutes or until crunchy golden brown.


Results & Changes: I didn't change much, I don't think I changed anything actually, except the pasta shape, I used Barilla Fiori which we love, for a fun spring flower macaroni and cheese twist. This is a nice basic macaroni and cheese recipe, you could personalize it by adding different cheeses or a bread crumb topping. The possibilities are endless and this is a great starting point for macaroni and cheese. I scooped out three little flower pot cups of macaroni and cheese for the kids. I was going to brown the tops of them, and then I was reminded that the kids don't like browned tops of anything. The kids ate theirs without the final oven browning -- which I think is only for looks, everything is certainly hot and cooked before going in the oven.


Two out of three kids liked this version of macaroni and cheese and they all liked being served their flower pasta in flower pots so I will have to start doing that more often :)


Tyler's Macaroni and Cheese is my choice for Tyler Florence Fridays this week. I know it's not quite Friday yet but this is a busy food blogging week and I thought I'd get my Tyler dish posted early. Thanks for visiting :)